Today we’re going learn how to create structural html elements, and style individual and groups of elements with classes.
Whoops, there is a typo at 15 minutes – when you use an element selection ( like a ) and a class selector ( like .button ) it’s the class selector styles that will apply!
Activity 1
P.S. Try not to copy and paste but rather to type yourself, as the muscle memory helps you to learn
1. In the html, create two h2, h3 and p elements
<h2> My name is Tina </h2>
<h2> I'm the co-founder of IOC </h2>
<h3> I was born in Australia </h3>
<h3> I live in Bali </h3>
<p> I love sunset walks on the beach with my puppy Houdini </p>
<p> My favourite coffee is a soy latte </p>
2. Write a default style for each
h2 {
  ...
}
h3 {
 ...
}
p {
 ...
}
3. Create a 3 classes with unique styles in your css. Experiment with adding these classes to various the html elements and watch as they override the default styles for each element (these are examples but feel free to use your own).
.bg-featured {
  background-color: #ff7979;
}

.big-text {
  font-size: 2.5rem;
}

.underline {
  border-bottom: 2px solid;
}

.fancy-text {
  font-family: font-family: 'Dancing Script', cursive;
}
Then experiment with adding these classes to the html elements and seeing what the effect is.
<h2 class="big-text bg-featured"> My name is Tina </h2>
<h2 class="underline"> I'm the co-founder of IOC </h2>
<h3> I was born in Australia </h3>
<h3 class="fancy-text"> I live in Bali </h3>
<p> I love sunset walks on the beach with my puppy Houdini </p>
<p class="bg-featured"> My favourite coffee is a soy latte </p>
P.S. If you want to use a google font, make sure you have added the link to the <head> in the settings.
Activity 2 - Light & Dark Sections

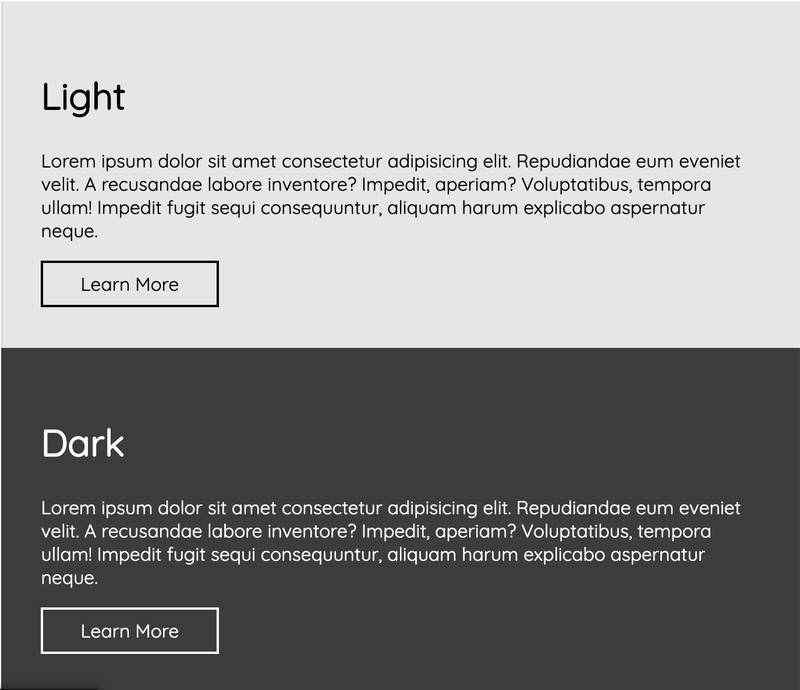
1. Start by setting up your html with two sections, each with a h2, paragraph and link. Add a class for each background, and one for each button.
<section class="bg-light">
    <h2> Light </h2>
    <p> Lorem ipsum dolor sit amet consectetur adipisicing elit. Repudiandae eum eveniet velit. A recusandae labore inventore? Impedit, aperiam? Voluptatibus, tempora ullam! Impedit fugit sequi consequuntur, aliquam harum explicabo aspernatur neque.</p>
    <a class="button" href="#"> Learn More </a>
</section>

<section class="bg-dark">
    <h2> Dark </h2>
    <p> Lorem ipsum dolor sit amet consectetur adipisicing elit. Repudiandae eum eveniet velit. A recusandae labore inventore? Impedit, aperiam? Voluptatibus, tempora ullam! Impedit fugit sequi consequuntur, aliquam harum explicabo aspernatur neque.</p>
    <a class="button" href="#"> Learn More </a>
</section>
2. Clean the slate with your CSS reset
* {
  margin: 0;
  padding: 0;
}
3. Set some default styles
body {
  font-family: "Quicksand";
}
section {
  padding: 5%;
}
h2, p {
  margin-bottom: 1rem;
}
4. Style your light and dark background classes
.bg-light {
  background-color: rgb(230,230,230);
}

.bg-dark {
  background-color: rgb(60,60,60);
  color: white;
}
5. Style your buttons
.button {
color: inherit;
text-decoration: none;
border: 2px solid;
padding: 0.5rem 2rem;
display: inline-block;
}
6. Bonus: Add a hover effect to your buttons
.button:hover {
  color: orange;
}
Here’s a link to the codepen finished example.
BONUS LESSON
Some of you have asked about how to style just a specific part of text within another element. This wasn’t planned to be part of the 7 day challenge, but I’ve included a little how to below.
To style just part of text element we need to use a new container element called a span.
<h2> My name is <span class="featured-text"> Tina May </span> </h2>
.featured-text {
  color: red;
}