Part 1 - HTML
In this exercise make sure you actually type out the code yourself, don’t just copy and paste. Typing helps reinforce the memory of how to do it, and a lot of coding is muscle memory.
We’re going to do this on CodePen first, then try copying it over to our desktop to use in Atom.
1) Create a new pen in CodePen. CodePen has the document setup built-in so whatever we type will go within the body tags of the html.
2) Let’s start by creating a section to hold all of our content.
2) Add a h1 element within the section that says your name
5) Add a h2 element below this that has a ‘tagline’ about you
6) Add a short paragraph (p element) about yourself
<section>
  <h1> Tina May </h1>
  <h2> Co Founder of Institute of Code </h2>
  <p> I’m a 27 year old entrepreneur with a passion for coding and travel (and   wine!). </p>
</section>
8) Add an image. Find an image through google images or your profile picture on Facebook. Right click on the image and ‘copy image url’. Add the image to your html document by adding the img tag, with a src (source) of the url.
If you don’t have one, you can use https://unsplash.it/300/300 which generates a stock image from unsplash. Generally image urls will end in .jpg or .png so if yours doesn’t work, check that you have the url of the image not just the page where you found it.
<img src="https://unsplash.it/300/300">
9) Let’s add a couple of links for people to connect with you. Later we’ll learn how to add icons, but for now we’ll just use the words, let’s add this between your h1 and h2.
<nav>
  <a href="http://www.fb.com/tinamay"> Facebook </a>
  <a href="http://www.instagram.com/tinamay"> Insta </a>
  <a href="http://www.linkedin.com/tinamay"> LinkedIn </a>
</nav>
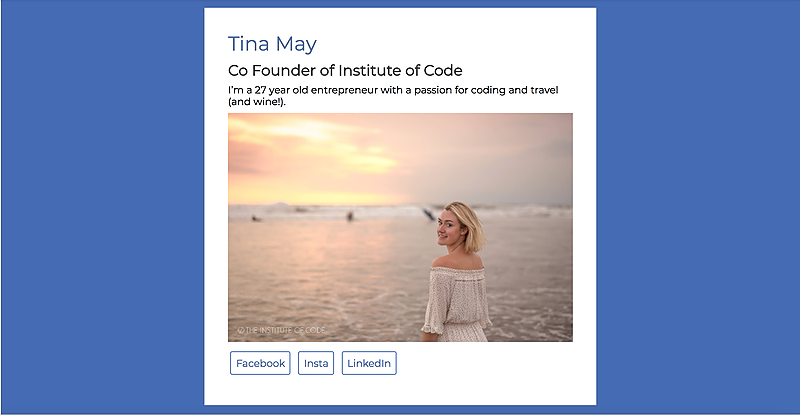
At this point it should look something like this, and your image will likely be way too big. That’s ok we’ll adjust that using CSS. 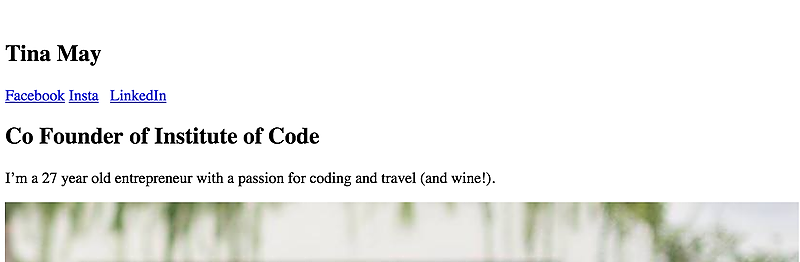
Part 2 - CSS
Please complete the HTML exercise before attempting this exercise.
1) Let’s get ourselves set up by adding the universal reset
* {
  margin: 0;
  padding:0;
  box-sizing: border-box;
}
1) First let’s add style to the whole page (the body). Create a body selector and apply a background color and add some padding.
body {
  background-color: #446CB3;
  padding: 1%;
}
2) Now let’s style the section. We want to change the background color so that we can see it against the blue background, then we want to change the size. We could just px or % – we want it to adapt to the screen size but never get too big so we can use both. Then let’s add some padding to give space inside the section.
section {
  background-color: white;
  width: 50%;
  max-width: 700px;
  margin: auto;
  padding: 3%;
}
3) Our image is probably too big for it’s container so let’s fix that by giving it a max-width.
img {
  width: 100%;
}
4) Our universal reset removed all the space between our typography, so let’s add some of it back so that it doesn’t look so squished. We could use pixels or Rems here, but it tends to look best when the space below an element is in proportion to it’s font size which is exactly what rem’s do.
h1, h2, p, nav {
  margin-bottom: 0.5em;
}
5) Next up are our links, and there is quite a bit to do here. Links are naturally inline elements which are finniky to style, so whenever we want to style buttons, we change the display to inline-block.
Then let’s add a border and give it rounded corners. Next we need to add some space, both inside of the border (padding) and outside of the border (margin). Then we just change the color, and remove the ugly default underline (text-decoration).
a {
  display: inline-block;

  border: 1px solid #446CB3;
  border-radius: 3px;

  padding: 0.5rem;
  margin: 0.25rem;

  color: #446CB3;

  text-decoration: none;
}
6) Now let’s style the headings. I’ve used the same blue color as I did for the background for the h1s and then a dark grey for the h2s but you can style them however you like!
h1 {
  font-size: 2rem;
  color: #446CB3;
}
h2 {
  color: rgb(60,60,60);
}
7) The only thing that’s left is to change the fonts. Head over to google fonts and find a font that you like, I chose Montserrat. Copy the embed code, and add it in to the head (which you will find in CodePen by clicking settings) then add it to the body selector.
body {
  background-color: #446CB3;
  padding: 1%;
  font-family: 'Montserrat';
}
That’s it! Well done. Try to play around with some different styles and just experiment. If you get stuck, save your CodePen and reach out to us through the private facebook group and we’ll help you out!
Troubleshooting:
- check that you have your syntax right with an open selector
{and a close selector} - check that you haven’t confused a colon
:with a semi-colon;and aren’t missing any quotes" - check your spelling (color not colour)
- if none of the styles are applying check the link to your css is in your html document and written correctly
- look for unusual colors or error messages in Atom.