Jekyll is a static site generator – a powerful tool that’s going to allow us to create complex elements, blogs, and repeatable layouts quickly and simply.
Want to learn more about Jekyll and the move towards static site generators? Check out these resources:
- https://davidwalsh.name/introduction-static-site-generators
- https://learn.cloudcannon.com/jekyll/why-use-a-static-site-generator/
- https://www.smashingmagazine.com/2015/11/modern-static-website-generators-next-big-thing/
One of the reasons we teach Jekyll is that it has a very quick learning curve – in just a few hours we can show you how to create functionality that would take us weeks to teach with a platform like Wordpress.
Further the skills you learn in creating Jekyll sites apply to other templating languages and platforms that you might want to learn in the future – including Wordpress and Shopify.
The more Jekyll you understand, the more powerful and well-organised websites you can create. Want to dive deeper now? Explore the docs at the CloudCannon Academy.
Reusable Layouts
One of the core features of Jekyll is that it allows us to create re-usable layouts – without Jekyll we have to code each page top to bottom (from the <head> to the <header>, all the page content, the <footer> etc). And if we want to change something in that header or footer, we need to edit the code on every single page. Not only is this annoying, it’s dangerously easy to make mistakes when you are trying to maintain websites with lots of pages.
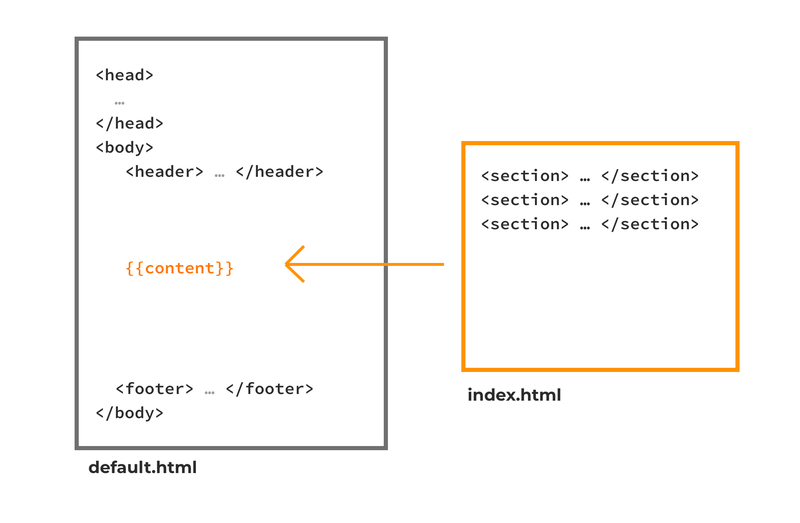
In Jekyll we split our page – the reusable parts that we want on every page become the layout (called default.html) and the only content that’s specific to that page stays in the index.html or other page files.
When you want to edit the <head>, <header> or <footer> or anything that you want to display on every single page you edit the default.html file and it edits everywhere at once.
Front-Matter
When we use Jekyll, we add ‘front-matter’ to the top of each individual page file (like our index.html, about.html, etc). Front matter gives extra information to the jekyll engine to tell it what to do – like for example to use the default layout.
---
title: Hello Tina May
layout: default
instagram: @hellotinamay
---
Liquid Templating
Jekyll uses liquid templating (the same one that Shopify uses) to create layouts.
There are two tags in Liquid:
- You can output variables by surrounding them in two curly braces e.g.
{{ variable }} - You can perform logic statements by surrounding them in a curly brace, percentage sign e.g.
{% if statement %} ... {% endif %}
In the example above when we want to pull in the content from each page into the default layout, we use the {{content}} tag.
---
title: Hello Tina May
layout: default
instagram: @hellotinamay
---
<section>
  <h1> {{ page.title }} </h1>
  <p> Follow me at {{ page.instagram }} </p>
</section>
Jekyll ‘runs’ every time we hit save, and it reads through the front matter and any liquid tags and then outputs plain html. If we inspected the page in the browser, it would look like this, and the liquid tags would have been replaced.
<section>
  <h1> Hello Tina May </h1>
  <p> Follow me at @hellotinamay </p>
</section>
Loops
Jekyll loops allow us to simplify the code for repeated elements. In this example below, Jekyll will loop through each ‘fruit’ object in the front matter and create a div with a h2, p and img.
{% for item in page.fruit %}
<div class="fruit">
  <h2> {{item.name}} </h2>
  <p> $ {{item.cost}} per kilo </p>
  <img src="{{item.image_path}}">
</div>
{% endfor %}
So if the front matter looked like this …
---
layout: default
fruit:
  - name: Pineapple
    cost: 7
    image_path: /images/pineapple.jpg
  - name: Banana
    cost: 5
    image_path: /images/banana.jpg
  - name: Apple
    cost: 2
    image_path: /images/apple.jpg
---
Then the output html (the final result) would look like this …
<div class="fruit">
  <h2> Pineapple </h2>
  <p> $7 per kilo </p>
  <img src="/images/pineapple.jpg">
</div>
<div class="fruit">
  <h2> Banana </h2>
  <p> $5 per kilo </p>
  <img src="/images/banana.jpg">
</div>
<div class="fruit">
  <h2> Apple </h2>
  <p> $2 per kilo </p>
  <img src="/images/apple.jpg">
</div>